With CalvinBall around the corner over at the Get It Scrapped Forums (It's free to sign up, by the way), I needed to prepare. How, oh, How do you prepare for an event that's whole goal is to get as many pages finished as you can within one month??
I started with an excel spreadsheet, because it's me and everything gets listed in excel. Going through some of my 2016, if I see some that spark a story for telling, I insert the date and the story on my spreadsheet in either the traditional page category or the digital page category. Frequently if it's going to take 2 or more pages, it gets put in digital. I just find multiple pages easier with digi for the most part.
For those traditional layouts, I edit and crop my photos ready and printed and the stories journaled.
Once the photos arrive, I place the journaling with the photos and each story gets kitted with some papers. I use paper pads, collection kits, kit club kits, or papers pulled from my stash.
Next I started with a small clean up of my craft area. I have 2 Rubbermaid 9-cube units that are side by side, only one side has a desk top. I'm still hopefully, hubs can make me a top for the other side before March first.
Now I still have a few days and what to do. Well, I was just thinking, I should use the time to really delve into some composition styles. Maybe setting a goal of 5 for each type of composition. Then on my Facebook feed, I see this post by Get It Scrapped, about Speeding up your scrapbooking with a go-to composition for getting started. I definitely see that as a great jumping off point too. My go to is a Band, L or T or layered center comp. But I definitely want to change things up a bit too. So now my next step will be to look at some different compositional foundations. I think I'll sketch them out and tape them to the wall for easy viewing.
Also I'll continue to pick up my space, as there is always things that can be organized.
Counting Down Starts Now = 5 days.

Showing posts with label Organization. Show all posts
Showing posts with label Organization. Show all posts
Friday, February 24, 2017
Thursday, November 10, 2016
Clean up, Clean up, every body, every where...
Clean up, clean up, every body do your share.... Yeah, I used to sing that with the kids when they were little.
I've accomplished not one iota of crafty goodness in the past TWO weeks. However, the light is not only visible at the end of the tunnel, so is the tunnel structure! Hurray! Yes, I'm been cleaning, sorting, and organizing my craft room over the last 2 weeks. Definitely, not the fun things to do in life, but the necessary things.
Before I share, if you're new to my blog, my disclaimer: When we purchased this property it was for a place to hunt for my husband. The house was given NO value, which tells you the shape it's in. This craft room is not the color I'd choose. It will be redone eventually.
That said, two things brought about the cleaning of the craft room.
First, past my standing craft desk against the wall and 2nd (back) door is my stamping station (a kitchen island cart), which is piled so high that even I didn't know what's on it nor could I get to my stamp blocks when I wanted to stamp.

Second, my husband found and purchased this at a garage sale. I really want to get it in my room, even if I haven't painted it yet.

So after some sorting, organizing, cleaning, and moving some furniture. I have this set up.


I took my craft desk which was 2 - 9-cube storage organizer units placed back to back, and moved them side by side. This means I'll need a longer table top. It also means I'll need support for the table top hand off in the back. I'm thinking another 9-cube unit on the back with only things I need infrequently and some rudimentary leg at the very end next to the wall. That way the printer stand can still roll in and out on that side. Also that unit hubs found at the garage sale should set on the table top against the wall. The stamp desk was moved so it will form an L with my craft desk. The tall white boards are the sides of white shelving that are placed back to back. The shelf facing the stamp desk is scrapbooking supplies. The other shelf faces out and makes a walk way to the bathroom. This shelf houses various supplies from medical, health, extra soaps/shampoos, light bulbs, with the bottom shelf being my craft books and my page protectors.

The above is directly to the right of the entrance. I cleaned off and moved that shelf next to my computer desk. It was going out from the corner against the side wall.

Behind the entrance door, I moved my embellishment drawers and paint tower and my paper cubes. That cardboard box needs to be moved to the save until Christmas wrapping pile. The blue bag is supplies I bought to make the kids school albums with long ago, before we were led to homeschooling.
There is still much organizing and cleaning that needs to happen. I still have to get my stencils taped around and put some J hooks on them to hang on the pegboard and organize my stamps, to name a couple of things.
 Also this whole corner needs to be cleaned out. The brown cabinet is my sewing cabinet. The electronics that pull the sewing machine into the usable position is broken. I don't even know who to call to fix that. But if I can't get it fixed, it will be replaced. My mixed media cart will roll into the spot in front of the window. There is a bathtub toy container there now that isn't used anymore.
Although it's definitely an improvement, there is still more that needs to be worked on. However, I feel so much better, I think I'll pull out a page kit and make a page. ...ok, it's been TWO weeks, I'm getting twitchy....
I've accomplished not one iota of crafty goodness in the past TWO weeks. However, the light is not only visible at the end of the tunnel, so is the tunnel structure! Hurray! Yes, I'm been cleaning, sorting, and organizing my craft room over the last 2 weeks. Definitely, not the fun things to do in life, but the necessary things.
Before I share, if you're new to my blog, my disclaimer: When we purchased this property it was for a place to hunt for my husband. The house was given NO value, which tells you the shape it's in. This craft room is not the color I'd choose. It will be redone eventually.
That said, two things brought about the cleaning of the craft room.
First, past my standing craft desk against the wall and 2nd (back) door is my stamping station (a kitchen island cart), which is piled so high that even I didn't know what's on it nor could I get to my stamp blocks when I wanted to stamp.

Second, my husband found and purchased this at a garage sale. I really want to get it in my room, even if I haven't painted it yet.

So after some sorting, organizing, cleaning, and moving some furniture. I have this set up.


I took my craft desk which was 2 - 9-cube storage organizer units placed back to back, and moved them side by side. This means I'll need a longer table top. It also means I'll need support for the table top hand off in the back. I'm thinking another 9-cube unit on the back with only things I need infrequently and some rudimentary leg at the very end next to the wall. That way the printer stand can still roll in and out on that side. Also that unit hubs found at the garage sale should set on the table top against the wall. The stamp desk was moved so it will form an L with my craft desk. The tall white boards are the sides of white shelving that are placed back to back. The shelf facing the stamp desk is scrapbooking supplies. The other shelf faces out and makes a walk way to the bathroom. This shelf houses various supplies from medical, health, extra soaps/shampoos, light bulbs, with the bottom shelf being my craft books and my page protectors.

The above is directly to the right of the entrance. I cleaned off and moved that shelf next to my computer desk. It was going out from the corner against the side wall.

Behind the entrance door, I moved my embellishment drawers and paint tower and my paper cubes. That cardboard box needs to be moved to the save until Christmas wrapping pile. The blue bag is supplies I bought to make the kids school albums with long ago, before we were led to homeschooling.
There is still much organizing and cleaning that needs to happen. I still have to get my stencils taped around and put some J hooks on them to hang on the pegboard and organize my stamps, to name a couple of things.

Although it's definitely an improvement, there is still more that needs to be worked on. However, I feel so much better, I think I'll pull out a page kit and make a page. ...ok, it's been TWO weeks, I'm getting twitchy....
Friday, August 5, 2016
A Hodge Podge of Activity
Wednesday had me schlepping my laundry out to do. On Tuesday as I was piling it in my van, my wonderful husband had a great idea of me trying to get passports for myself and the kids. Sometime in our future, we are planning to visit an area where the border of MI and Canada is so close it would be a shame to not pop across. I went to the designated place to find out the information needed: Hubs and I both would need to be present to get passports for the kids. So I went home, filled out the forms, grabbed the proper identification, and snagged up the family. It was really quite an easy and painless process, well, except for the pocket book which is still groaning and moaning over the cost of 3 passports. Then we had a bit of an unexpected adventure afternoon which included a ride up the peninsula with a view of the lovely wineries, a library book sale with 5 stuffed bags for $10, and an antique shop. Super fun and relaxing afternoon that makes you forget that you had to go to the laundromat. (The piece for my washer came yesterday, so hopefully I won't have to do that again soon.)

Great view, huh?
Yesterday, had me cleaning off that mess of a desk I shared on Wednesday. You know, so I can make a bigger mess.


The latest layout that I finally finished. I really hate when real life gets in the way of my play time.
Photos are from 2009. I even spent some time yesterday afternoon organizing all of dd's layouts in her albums. And started a new layout. However, then I decided I really need to get messy. So I cleaned the desk off again. Some mixed media backgrounds to follow.
Friday, July 8, 2016
Choosing a New Task (Thursdays post on Friday)
I've reserved Thursday's to keep myself accountable for larger monthly or longer projects. I last tackled how I organize each area. I walked away with a working list of things to do. I've accomplished some of that list which you can see here. The more time intensive and the ones that I need my husband for are still out there.
It's been awhile since I've worked on a larger monthly crafty project. The kids rooms, vacation, outdoor projects and just everyday items have been taking too much of my time. Although we still have travel for a doctor's appointment for my daughter and my son's birthday vacation to do go through yet this summer, I believe it's time to start a more regular craft task.
My problem lies in choosing one. The top 3 that come to mind are: tagging my photos for easier finding or tagging all of my digital items for easier finding or resorting all of my pattern paper. All of these take so much time that I cringe and balk at the idea. I think I need to start smaller, and I couldn't think of a one!! But I see in my above referenced post these two items left outstanding.
So Stencils Win!!
It's been awhile since I've worked on a larger monthly crafty project. The kids rooms, vacation, outdoor projects and just everyday items have been taking too much of my time. Although we still have travel for a doctor's appointment for my daughter and my son's birthday vacation to do go through yet this summer, I believe it's time to start a more regular craft task.
My problem lies in choosing one. The top 3 that come to mind are: tagging my photos for easier finding or tagging all of my digital items for easier finding or resorting all of my pattern paper. All of these take so much time that I cringe and balk at the idea. I think I need to start smaller, and I couldn't think of a one!! But I see in my above referenced post these two items left outstanding.
- Organize my stamps into sheets by what the are.
- Stencils – put a layer of duct tape around and J hooks on
So Stencils Win!!
Thursday, May 12, 2016
Ranger Thinks of Almost Everything
I thought it would be time to move on from sharing my craft room. The list of organizational things still yet to be accomplished was shared to finish up my postings on the subject. I thought I'd only revisit when the larger projects were out of the way. However, yesterday, as I started to work on on some ATC swap cards, the realization that I dislike how my Distress Ink foam pads are stored hit me like a ton of bricks. I had to do something! RIGHT THEN!
This is how I was storing my foam pads. Sorry I didn't take a before photo. I had 2 cardstock sheets that were front to back with boxes and the Distress Ink name typed underneath. These were stored in an 8.5x11 page protector. It's cumbersome to search for the right color, then take out the sheet and get the foam pad, at least to me.

I started ripping up the sheets. The velcro piece were then glossy accented to the backs of the Distress Ink case. The foam sets there awaiting use and ready as soon as I pick up the ink pad. Nice!!

 Do you store your foams on the back? If yes, how do you store them after? Any ideas for me?
I've thought of just getting another one of these cases and setting it on top of the other on my stamping station shelf.

I've also pulled a color chart from the Ranger site to stamp out the colors in and a label sticker sheet to update my little squares here (some don't have them at all). Handy tools. Ranger thinks of everything. Well, almost, if they thought of everything, they would make the cases to house the little foam rectangles and still stack nicely.
And here is 2 of my in progress ATCs. The one on the right will say "sunshine always follows showers", but I have to type out the always & follows as the TH chitchat stickers I have don't have either word.

This is how I was storing my foam pads. Sorry I didn't take a before photo. I had 2 cardstock sheets that were front to back with boxes and the Distress Ink name typed underneath. These were stored in an 8.5x11 page protector. It's cumbersome to search for the right color, then take out the sheet and get the foam pad, at least to me.

I started ripping up the sheets. The velcro piece were then glossy accented to the backs of the Distress Ink case. The foam sets there awaiting use and ready as soon as I pick up the ink pad. Nice!!
Unfortunately, the case that I had them stored in and previously had fit all of my currently owned Distress Inks, will no longer house them all. They also don't line up as nicely as they use to or stack as nicely. The benefit of the foam pad being available without a search and ready to use, I think, outweighs any inconvenience of stacking and fitting.

I've thought of just getting another one of these cases and setting it on top of the other on my stamping station shelf.

I've also pulled a color chart from the Ranger site to stamp out the colors in and a label sticker sheet to update my little squares here (some don't have them at all). Handy tools. Ranger thinks of everything. Well, almost, if they thought of everything, they would make the cases to house the little foam rectangles and still stack nicely.
And here is 2 of my in progress ATCs. The one on the right will say "sunshine always follows showers", but I have to type out the always & follows as the TH chitchat stickers I have don't have either word.

Crafty Hugs and Blessings,
Thursday, May 5, 2016
Craft Room - The Take Aways
From showing off my room all of last month, I made a list of items that needed to be addressed. Yes, I'm a list maker. I always have a list or 6 going. I have a list of movies I would like to watch, list of current meal plans which I use to make my grocery list, list of stories to tell, list of completed scrapbook layouts, list of crafty projects, list of home projects, list of school work for the kids, and a list of outdoor projects.
 This is my current view of the scrap room. I've got some paper colored on my desk so I can make ATC cards for the woyww anniversary swap. I have papers and photos for 2 layouts to the side. You can see the corner of my desk in the bottom right of the photo is already piled with cords and papers. Some of my list making spiral notebooks as well as one for my daughters health issues. So that needs to be cleaned again.
The following list is just for my craft room organization and a couple small decor pieces TO DO list. Some of them I already knew about, some of them I didn't. Now remember this is the color of the room before I moved in, since it will be ripped to the studs eventually, I will not be doing painting or lights and such.
These are for my husband to do.
As you can see I've already been able to cross a few things off of the list. The reason I love checklists, that whole drawing a line through the item upon completion. Yay!! I know, I need help. Also when going through and telling of my paper tower storage, I saw that my navy cardstock was below my other cardstock and specialty stuff was in it's place. So I switched them. Then I rearranged the whole second cube's paper to be in a better order.
I'll just keep plugging away at the list while keeping it in balance with all my other lists, or at least trying to keep it in balance.
Sharing my room definitely helped me think some things through and see some areas of improvement along the way. Thanks for letting me share.

The following list is just for my craft room organization and a couple small decor pieces TO DO list. Some of them I already knew about, some of them I didn't. Now remember this is the color of the room before I moved in, since it will be ripped to the studs eventually, I will not be doing painting or lights and such.
These are for my husband to do.
- Put up a bulletin board behind computer. (I have the bulletin board already, so I just need his time which he currently doesn't have.)
- Pegboard on the wall – 1. Large or 2. Smaller.
- Where the pegboard is now, put up bars for punches.
- Organize my stamps into sheets by what the are.
- Stencils – put a layer of duct tape around and J hooks on.
- Find a spot for current to use items.
The special project papers on scrap side bookcase need to be gone through. I should decide if it's still a project that I'll do and if I want to keep it. Or if it's not, I should integrate into my paper storage.Roller stamps should go in iris cases under stamping station.Move alpha rub-ons to go with stamp alphas.Put punches in with hearts and stars.On the rolling cart, I’d like to store my laminator and supplies, plus I’d like to put my Printer on the top. The middle could be for dies and Big Kick. I need to change the shelf to the middle and put the open hanging file are on top and then have a board cut for the top to make this happen. I have the board and hubs will be cutting it down for me today. Hurray!
- Paint the base of the 8x8 calendar swap holder and put together.
- Join a rolodex quote swap. (I could use more quotes to fill up my holder)
- either rip the room to the studs and start over, or
- build an outbuilding with a craft room, kitchen and tool shop.
As you can see I've already been able to cross a few things off of the list. The reason I love checklists, that whole drawing a line through the item upon completion. Yay!! I know, I need help. Also when going through and telling of my paper tower storage, I saw that my navy cardstock was below my other cardstock and specialty stuff was in it's place. So I switched them. Then I rearranged the whole second cube's paper to be in a better order.
I'll just keep plugging away at the list while keeping it in balance with all my other lists, or at least trying to keep it in balance.
Sharing my room definitely helped me think some things through and see some areas of improvement along the way. Thanks for letting me share.
Thursday, April 28, 2016
Craft Room - Scrap Side
From my previous posts you can see the general layout of my little space.
and oh, yeah, I forgot the disclaimer. You know the drill by now, but I gotta include it. I have a room that will be eventually remodeled, but it's last on the list. When the contractors had to break into the walls and ceiling to add extra support for the upstairs while leveling the house, I didn't have them make their dry wall patch look nice. I couldn't do the extra cost for something that will be replaced. So the messed dry wall and dark blue walls are not me.
So this is is my scrap side of the desk.
 The cube system on the scrap side. Don't mind the taped bag to the floor. There is a vent that goes directly to the basement in the middle of the floor without anything to attach to it on the other side. We taped as many holes while the contractors were down there jacking up the house in December. When the floors get redone in here the hole will go away. But I like the bag there as I don't lose die cuts and small bits down to the basement. On to what's in the brown cubes.
The top left cube has doilies and silhouette die cuts, tissue tape, and smaller mistables.
The top middle cube comprises folders cut to size inside and are labeled: girl, boy, religious, school/office, envelopes, etc. plus all of my rub-ons are in there.
The top right cube houses all things flower: dies, punches, and flowers of all shapes and sizes.
The middle left cube is empty.
The middle middle cube contains clear stamps of various types.
The middle right cube holds religious stamps.
The bottom left cube includes embroidery floss and tulle and burlap.
The bottom middle cube is naked chipboard.
The bottom right cube alphabet stickers.
Note: My stamps could use a bit more organization. I have been thinking of taking them apart and grouping them by type. All arrows together, all hearts, all cameras, all flourishes, all stars, etc. I've only ever heard of one other person doing it this way, Aeryn Kelly. She shows it in this video and the stamp section is around 16:20. So it'll go on my list of things to do. I would want to know who the manufacturer and what set they are from though.


and oh, yeah, I forgot the disclaimer. You know the drill by now, but I gotta include it. I have a room that will be eventually remodeled, but it's last on the list. When the contractors had to break into the walls and ceiling to add extra support for the upstairs while leveling the house, I didn't have them make their dry wall patch look nice. I couldn't do the extra cost for something that will be replaced. So the messed dry wall and dark blue walls are not me.
So this is is my scrap side of the desk.

The top left cube has doilies and silhouette die cuts, tissue tape, and smaller mistables.
The top middle cube comprises folders cut to size inside and are labeled: girl, boy, religious, school/office, envelopes, etc. plus all of my rub-ons are in there.
The top right cube houses all things flower: dies, punches, and flowers of all shapes and sizes.
The middle left cube is empty.
The middle middle cube contains clear stamps of various types.
The middle right cube holds religious stamps.
The bottom left cube includes embroidery floss and tulle and burlap.
The bottom middle cube is naked chipboard.
The bottom right cube alphabet stickers.
Note: My stamps could use a bit more organization. I have been thinking of taking them apart and grouping them by type. All arrows together, all hearts, all cameras, all flourishes, all stars, etc. I've only ever heard of one other person doing it this way, Aeryn Kelly. She shows it in this video and the stamp section is around 16:20. So it'll go on my list of things to do. I would want to know who the manufacturer and what set they are from though.

My jetmax and recollection cubes set on rolling planter stands so I can move them around easily.
From top to bottom:

From left to right:
all things heart including dies (excluding punches)
all things stars including dies (excluding punches
slick writers for fabric and paper, pearls, alcohol inks, stickles, and distress reinkers.
Note: I see that my heart and stars don't include the punches. For the stars there is easily room to include them. For the hearts, I may need to include another drawer for hearts or think of a different space for them. Hearts are one of my go to embellishments.

The first 2 smaller drawers are all die cuts and stickers and newer ephemera
The larger drawer houses stampin' up reinkers. then labels, arrows, tabs, frames, and tags. I use the very back part to hold small things that are presents for the kids (currently a video for my son is in there). You can never have too many hiding spots.

Empty.
All things dragon for my son, acorn for my hubs, and owl for my daughter.
Scrap paper.

All things butterfly including dies and punches. This is packed full.
Wine corks. (I said I was going to make trivets with them when I started saving them. It's been over 4 years, and I have yet to make a one.)
Embossing supplies, flock, pearl ex, mica powders.
Overall I'm fairly happy with this set up. While standing at the craft desk, if I turn right I'm directly in reach of all my paper. If I turn around I have my dies and sizzix, my markers, 6x6, embossing folders, and bling from the bookcase. Keep turning or turn to the left, I get to my stamping station and my peg board on the top with the smaller embellies.
Still a work in progress, but I definitely have found some things that work for me. Does your space work for you?
Thursday, April 21, 2016
Craft Room Organization - The Room Overview and Paper Storage.
Please remember my disclaimer. Yes, I do have to include it in every room post. I have a room that
will be eventually remodeled, but it's last on the list. When the
contractors had to break into the walls and ceiling to add extra support
for the upstairs while leveling the house, I didn't have them make
their dry wall patch look nice. I couldn't do the extra cost for
something that will be replaced. So the messed dry wall and dark blue
walls are not me.
This is the view from just inside my doorway.


1. The literature holder houses 8.5x11 paper sorted by color including specialty.
This is the view from just inside my doorway.
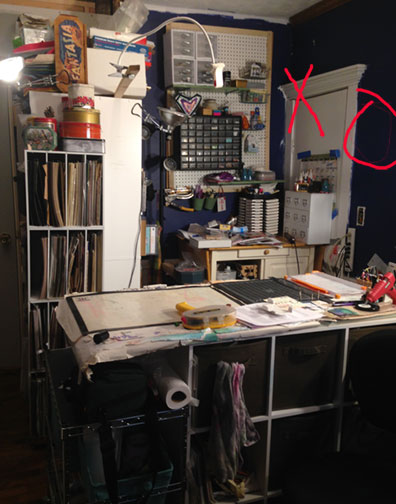
The closest closetmaid 9 cube is my mixed media side of the craft desk. (You can see my post about the mixed media side here. You can see my desk and bookshelf #1 here. You can see my scraps storage here.)
My scrapbook side is on the far side, and you can see the kitchen butcher block/island that is my stamping station, a pegboard with various things.
There are 2 bookshelves that set back to back. The one that faces toward the non-crafty side of the room is used to store hand towels & wash clothes, extra bathroom supplies and medical supplies. However, the bottom shelf houses crafting books and page protectors.
A rolling cart sets beside the craft desk. It houses punches, my laminator and foil, some duct tape, my camera, and ??. I still have a blue canvas bin that could be filled.
THE RED CIRCLE - Future home of a large pegboard unit, which will house my stencils for sure.
THE RED X. I've blocked it off this door, and only use the door off of the great room. I go back and forth over whether I want to get rid of this door altogether in the remodel or leave it, just in case so I can change the room design around or whatnot. (or whatnot happens to be one of my new favorite little words.)
PAPER STORAGE: You can see my paper tower. It's 4 jet max or recollection cubes with dividers. I put them on a planter rolling base. So it's very easy to roll it out of the way and clean.
Top Cube:
- black/gray;
- browns/kraft;
- cream/white;
- specialty (vellum/tranparency, mulberry, velvety).
Second from Top Cube:
- TH coordinations cardstock pack and Navy cardstock;
- Polka Dots divided into tone and tone and mixed colors, wood grain, striped, & more neutral tone on tone patterns;
- Office, school, text, grids, sandpaper, canvas, shaped papers
- Music books, mulberry, chipboard
Third Cube:
- Paper pads
- Feminine papers & Masculine papers
- Collection kits
- My Minds Eye
Final Cube:
- Homey or Vintage feeling papers, Old Cocoa Daisy kits, a set that need to be gone through
- Vibrant papers, and older MME paper pad papers (these could be moved to the other MME slot)
- Older Collection kits, Travel themed papers
- Basic Grey
On top of the tower is old tins. Several are empty. i have twine in one, washi in one, flair in one.
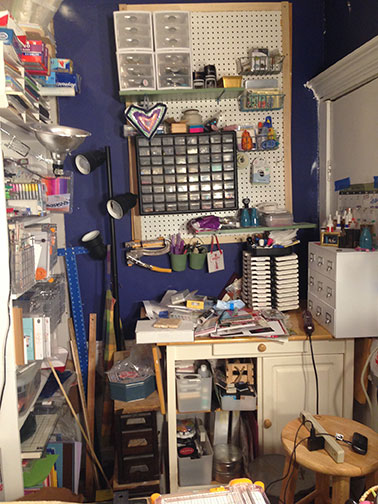
This is my stamping station and pegboard.
Behind the door is stamps. SU! sets (I used to be a demonstrator), and other wood mounted, all alphabet stamps. The 2 bottom shelves: inks, applicators, and stamping pad. The top is still leftover Calvinball carnage that needs to be put away. (Hey, don't judge, it's only been 21 days). It also has my SU ink caddy, which is all dye inks. I bought the white Recollections embellishment holder for PL styled cards storage. I have them by orientation. They don't really fit, so I don't recommend it. But I use it. Also the We R Memory Keepers one looks like it's discontinued (boo hoo).
The pegboard has various things I like to keep close by. The screw/nail organizer holds eyelets, brads, sequins, wood veneer, buttons and all things tiny.
The sewing drawers (setting on the floor between the stamp station and the bookshelf) hold 12" border strips, rubber bands, O rings, and a couple of drawers are empty.

Bookshelf #2
On top of the literature holder is wax paper, freezer paper, 2gallon sized bags, and a basket with smaller bags and used larger bags. Since I don't get into these often, it's a great out of the way place that is still accessible.
1. The literature holder houses 8.5x11 paper sorted by color including specialty.
2. An old pepsi bottle holder on its side is used for markers. Then I have my copics, colored pencils, and a small basket that has alphabet rub-ons (I think these should go with my alphabet stamps so I remember to use them).
3. The wire baskets are from Michaels and I love them. They are my favorite organization tool. I love that they are open, I hate lids. The contain the mess without looking bad. From front to back: basket 1 - Enamel Dots, Bling and Pearls; a second paper trimmer; basket 2 - 6x6 pads; basket 3 - embossing folders and metal stencils.
4. All things sizzix big kick: Sizzix pads and utensils. Basket 1 - Shapes; Basket 2 - alphabets; Basket 3 - seasonal & holiday. (obviously this is the spellbinder, technique tuesday, sizzix, my favorite things and all other brands of dies)
5. SU roller stamps (thinking this will go in an iris style 4"x 12"x12" box and slid under the stamping station). Sizzix Big Kick.
6. circle cutter and scoreboard. The right side is various 12x12 acrylic shapes, 12x12 stamp sets, and 12x12 chipboard sets which is topped off with my drawing tools in a blue pouch.
7. My coluzzle. and a blank space for something flat.
8. colored cardstock and various projects and other papers that were bought with a special project in mind. The special project papers need to be gone through. I should decide if it's still a project that I'll do and if I want to keep it. Or if it's not, I should integrate into my paper storage.
That's enough for one day! Next Thursday, the scrapping side of the work desk.
Have a terrific Thursday.
Thursday, April 14, 2016
Craft Room Organization - The Desk & Bookshelf One
OK, OK, I know I shouldn't share this. Please remember my disclaimer from the other day. I have a room that will be eventually remodeled, but it's last on the list. When the contractors had to break into the walls and ceiling to add extra support for the upstairs while leveling the house, I didn't have them make their dry wall patch look nice. I couldn't do the extra cost for something that will be replaced. So the messed dry wall and dark blue walls are not me.
This is why I haven't been using my silhouette cameo recently. Since the rest of the room is piled with things that will go to other parts of the house, I can't get to my filing cabinet. Things have just been getting piled up higher and higher. I feel like one more piece and the whole desk will topple.

So last Saturday, I took the opportunity of cleaning up some of the craft area. I started with the desk. I can now easily use my silhouette. Hurray!
 I've decided that I really want a bulletin board behind my computer. It would be great to pin bills to be paid and things I want to remember. Also please note that the yellow doodled post it notes are doodles from my husband while he was working at my desk. My daughter leaves me tiny cootie catchers, little paper hats, and airplanes if she watches a show on my computer. I'm loved. Also this desk will be replaced sooner rather than later. I've seen some at goodwill, but I need a compact with a keyboard tray. (my keyboard tray is broken and beyond repair.)
This is the bookshelf that is close to my desk.

I'm loving sharing how I've currently gotten things arranged, as it reminds me what I want to change or what needs work. I've started a list of items that I'll need to do as a result. Score.
This is why I haven't been using my silhouette cameo recently. Since the rest of the room is piled with things that will go to other parts of the house, I can't get to my filing cabinet. Things have just been getting piled up higher and higher. I feel like one more piece and the whole desk will topple.

So last Saturday, I took the opportunity of cleaning up some of the craft area. I started with the desk. I can now easily use my silhouette. Hurray!

This is the bookshelf that is close to my desk.

Shelf
- The top shelf has plastic shoe boxes with ribbon, fibers, and lace. Yeah, that's a lot of ribbon. There is a black plastic drawer unit that houses foam stamps. On top of that is boxes with beads and such. A Tattered angel book that I haven't put together yet. And the wire crate made into shelves. I've used these for in progress projects or for drying time to art journal pages and to store newer craft items to use until I integrate them into my storage. I love this. I do need a step stool to get to the top, but that's ok. These will all stay here and as is.
- My stories to be told and ideas. My calendar swap calendar, which still needs to be put up, but I want to paint the base. The green wooden basket has my glue gun and deco art foil. Those have already been moved and the basket is now empty. My glue gun out on my craft desk. And I just found a spot for my laminator, so the foil moved closer to it. Next on the same shelf is spray glues and hair spray.
- I have video stuff, printer ink, and the red circled area is my stencils. My stencils I would like to put a layer of duct tape around them. It helps give an extra area to protect your page, although it doesn't look pretty. Then I'll attach J-hooks to them so that I can hang them from a pegboard.
- A rolodex quote swap holder. My photo printer. Above the printer is a space saver shelf insert. It currently is housing all of my current Shimelle lines, especially as I await pieces of Starshine. And a few other choice pieces of currents (hello, love and finders keepers). They should be in the top shelf wire crate, but I had a huge box in the way and couldn't put them away. I think I'd like to find a better spot for "current: to use" items anyway
- Some white cardstock for the silhouette, printer paper, acetate, labels, Bibles, prayer binder & study things, Bible art journaling material. A handcrafted box that will go upstairs to my bedroom once the kids rooms are finished. Then onto the boxes which will possible find a new home, they contain - hot glue shapes for gelli printing, clay, beads, acrylic fragments. My light box and some various pieces that are in progress or that the kids had completed.
- My Silhouette shelf. All things silhouette. Only thing missing is my vinyl.
- The bottom shelf is various papers and then books for mixed media.
You can see the bookshelf sets next to my mixed media cart.
I'm loving sharing how I've currently gotten things arranged, as it reminds me what I want to change or what needs work. I've started a list of items that I'll need to do as a result. Score.
Saturday, April 9, 2016
Craft Room Organization - Scraps
I used to have a huge wicker basket that anything left over from a project, including cut out stickers and notions that I thought I'd use but didn't would go into. Actually it's probably still in a box somewhere from the move. I loved this system because you would come across an atypical color combination and like it. Definitely one I wouldn't have originally thought of. I disliked it because it was a pain to sort through and it became super full super quick.

Over on the Scrap Your Scraps Facebook group, Tori Bissell asked for us to share how we store our scraps. This is one drawer of a Recollections 2-drawer cube system.
As you can see from the above photo, there are several pieces sticking up that are easily the height or larger than the drawer height of 7". I try to put anything I believe large enough to be put as a block on a page back into the original paper storage section, and go even smaller if it's a paper pad. However, have I mentioned before, that I'm a lazy scrapbooker? Well, my laziness extends into cleaning. So I only succeed about 80% of the time. The other 20% even those larger pieces are going to go into the scrap bin. They are sorted by colors with a 2 sections for neutrals that get lumped together. I have vellum and mixed colors where one doesn't strike me as predominate. And the very front is card bases that I've made and not used yet or the inserts for A2 cards.
Why I love my current system? I love that I've switched to only saving the very small items here. I love that I'm storing the larger items with like items as I use them more. I like that I store all of my paper pad scraps with my paper pads. I use them way more. Constraints & Limits on the drawer space: This works so much better to know that I only have so much space for my scraps.When it starts to get to full I either need to make some cards or some scrap your scraps layouts.

I also have this octagon storage tin which is where I put those notions I've been too lazy to put away or things that I really want to try to use. Bonus, it has a hummingbird, my favorite, on the lid. The photo doesn't do it justice. It's so pretty, really. This use to be on my craft desk or next to it. Now due to the set up, it actually sets behind me on these sewing drawers. If I had all the money to create my special crafting nook, it would be shabby chic with lots of olden wooden furniture and tins and luggage and lace and old quilts and..... sorry, I got distracted.
That's how I handle my scraps.
So guess what? This drawer is pretty full! This week, I will be challenging myself to use these scraps and one of Tori Bissell's Scrap Your Scrap video/challenges. Play along if you'd like. You have until the end of April to link up. If you like to use your scraps or need inspiration, I highly suggest the facebook group linked above.
Subscribe to:
Posts (Atom)